How to format a book for print in Adobe InDesign
Rather than starting from scratch, this guide to InDesign formatting will assume you’re using one of my InDesign book templates. That way we’ll skip a lot of technical stuff you don’t really need to know about. Even so, InDesign can be frustratingly complex. I recommend hiring someone on Fiverr.com to do the initial formatting. If you have your book ready and send them the fonts and clear instructions (along with a template) it should cost less than $100.
But it’s nice to have InDesign and know how to use it, so that I can later make small changes or fix typos without having to go back to my designer each time. These videos should help you get started, or use the guide down below.
Make sure to sign up for the free package of book formatting templates. If you’re self-publishing, it’ll save you a lot of time and money.
Formatting a Book in Adobe InDesign (PART I)
InDesign is a legacy book formatting software, meant for print design – so for magazines and media/graphic heavy content, it makes sense. But most books are all text and there are clear and simple rules… formatting in InDesign used to be a way to get around the weird expanded line breaks that Word struggles with, because it’s just a better product, but it’s also expensive and hard to learn.
You CAN grab my free templates and figure it out, but honestly I don’t think you should be using it at all (I paid $500 to format my first book, and it had tons of notes and stuff, but even so… these days I format in MS Word and convert straight to epub for kindle.
Publishing is one of the many things you need to sort out, and I don’t think formatting should be your biggest worry or your biggest expense… which is why I’ve spent a decade making free templates and tutorials.
But basically, you set up a “master” page which is like a page style, that you can apply to all similar pages. You’ll probably have a right, left and blank page – these are similar to MS Word styles.
Formatting a Book in Adobe InDesign (PART II)
Once you’ve got all your master pages set up, you can tweak your headers and fonts, and make sure everything is consistent. IF you’re using my templates, you *should* be able to copy and paste your entire manuscript, but you have to understand the “overflow text” issue first, and then you’ll have to go through and break/fix all the chapters.
If you’re looking for a simple, plug-and-play book formatter, you’re probably thinking of something like Vellum, which is the best current option (only for mac, but you can use mac in cloud as workaround).
Formatting your book in InDesign (for print publishing)
The video tutorials above should be useful, but here’s a text based walkthrough in case it helps – I’m going to match the style with this cover I made for diybookcovers.com (I made this cover in Microsoft Word if you can believe it).

I’m going to start with a very simple, basic InDesign Book Template. Here’s the link to the template I’m using in case you’re following along:
IndesignbooktemplateNEW.indd
You should be able to download this template by clicking it. It’s basic, so you should grab the others in the free formatting bundle.

The first thing I’m going to do is copy the first chapter of my book (from the Word file, or wherever you have it), and paste it into the first paragraph of the InDesign file.
Pages should automatically be added, so that the rest of the text is pushed down to the end of the document. (If that doesn’t happen, I’ll tell you how to fix it later.)
For now let’s set up our main styles.


I’ll highlight the “Chapter One” text and set it to Trajan Pro, all caps to match the cover. Then I’ll highlight the text again, and hit the little panel button on the top right of the Paragraph Styles panel (right under the X to close the panel). I’m going to save this as a “new paragraph style” rename it “header1.”
Now “Header1” shows up under my Paragraph Styles – next time I get to a chapter heading, I’ll just highlight it and hit that style. If I want to edit the style for all chapter headings, I’ll click on the style in the Paragraph Styles panel and adjust things (for example, I’ll probably want the letters to be spaced out a bit, so I can go to “basic character formats” and increase the “tracking.”)

I’ll do the same thing for the subtitle, increasing the font size, making sure the text is centered. I change the font to “Lato” to match the cover, then saved it as “Scene” (because in this book, the subtitle describe the scene). If I make changes to the text on the page, I can highlight it, hit the little box inside the Paragraph Styles panel again and choose “Redefine Style” so that my changes are automatically applied to the style.


For the first paragraph, I’m going to set the font to Sabon, 11pt, with 18pt line spacing. Then I’ll save it as a new style, “NoIndent.” Then I’ll open that style and adjust the “Indents and spacing” so there’s actually no indent. I do the same for the next paragraph, but setting an indent, and saving it as “Normal.”
(When you pasted your text in, it probably already had a style assigned by default. You can just redefine the current style so it applies to most of your text. Or, set the second paragraph style first, and then paste your text into that paragraph to keep the style.)
Make your book beautiful… without the headache
Psst… have you downloaded our free package of templates yet? It includes InDesign templates to help you get started quickly! Click here to download them all.
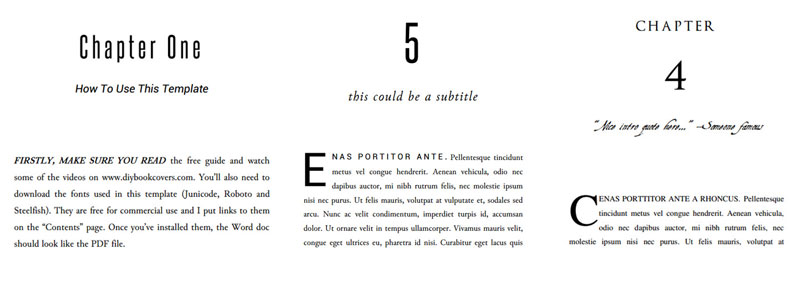


I wasn’t quite happy so I fiddled some more, making the subtitle smaller. Then I added a dropcap, by going to the little extra panel at the very right of the top menu, which gives me a dropcap option.

Then I selected the first few words of the first sentence and made them all-caps.
This is what my first page looks like now.

Using Master Pages
If I scroll down to the next page, I can see that everything looks pretty good, except that I need to adjust my headers. You can’t just click up in that area to edit them however; that information is set on a “Master Page.”

If I click on the Pages Panel, in the main box I can see my document and all the pages – in those little icons, at the top, is an “H” or an “I”. Those are two different master page styles. At the top of that panel are my master pages, called “H” and “I”.

“H” is totally blank, with no headers, for my chapter pages or front matter. “I” has headings and page numbers. If I click on that template, I can change the author name and book name, and style it a bit.

I don’t want to do anything with the page numbers, which display here as only the symbol “I” (if this is confusing, my master pages could have been named “A” or “B” or something else. It’s just in this template I started with, they are called “H” and “I”.)
Those page numbers are automatic, so on this page there’s just a placeholder symbol.
Now if I click back in the document section of the pages panel I can see that my changes are kept.

Now I’ll scroll all the way down to the end of Chapter One, doing a quick check. Something I notice is that several pages are blank and don’t have headers. That’s because, in the original template, these pages were set with the master page “H.”

I need to reset them with the master page style “I”.
In the Pages Panel, I put my mouse over the page I want to change and right click, then choose “Apply Master to Pages.” Then I’ll pick the style I want.
Since my original template had short chapters, now that I’ve put in my text I need to do this several times.
Overset Text
When I get down the end of the document, I notice a lot of the text is cut off.
My template was only for 49 pages, and when I added my new text InDesign didn’t make new pages for me. If I click the arrow tool from the tools panel, and then click in the text area of the page, it will show me a red “+” sign – that means there’s overset text.

First, I’m going to insert some more pages. I right click on that last page (in the Pages Panel) and choose “insert pages.” I’m going to add 50 for now.

Then, I’ll go back and click on that little red “+” sign. Now there will be a little snippet or preview of the text under my mouse; I’ll go down to the next blank page of the new pages I made, and click the mouse again.

All the overset text will be copied in.
This will work fine as long as you made enough pages for the overset text. But if you didn’t, on the last page you’ll get that red “+” sign again.
But there’s a way to avoid this if you aren’t sure. After hitting the red “+” and getting the overset text on your mouse, hold down shift when you click in to the next page. Now under the mouse, instead of the text you’ll see a little snaky line – that means you have the “autoflow” feature on.
If you click the mouse while holding shift this way, when you paste the text InDesign will automatically add extra pages as needed.
So now I’ve pasted the rest of my book, but I still need to go through it and apply the styles to all the chapter pages; and also apply the right master page to those pages (and remove it from any that should be ‘normal’ pages with the header and footer).
A quick cheat is to go back and highlight the first paragraph and heading from the first chapter, and copy+paste it to the first pages of other chapters. Then I just have to change all the text to make it right. For me, that’s faster than selecting the right style for each element, redoing the dropcap, etc.

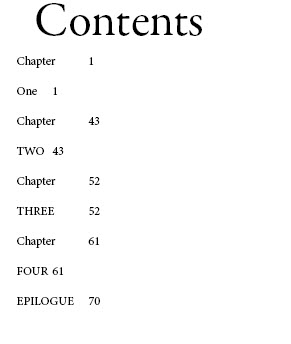
Updating the Table of Contents
My templates should have a TOC already, but you’ll need to update it.
Go up to the Layout tab and you’ll find the Table of Contents menu.

I used “Header1” for the chapter titles, so I need to add that style to the TOC instead of the default ones.

That sort of worked, except it divided up the Header1 tags into two entries, so I’ll need to combine them all, and add some styling.
If you need more help, I recommend searching YouTube for your specific problem, “How to X in InDesign?” or signing up with Lynda.com for some more robust training.
As I said earlier though, rather than beating your head against a wall, I’ll give it to someone on Fiverr.com and pay to have it done well, and right (otherwise, what’s the point of using InDesign?)
Don’t forget to grab your free templates!
The free package is the fastest way to get started quickly, without the overwhelm. Click here to download them all, so you can finish designing your book and get back to writing.
More book formatting resources
If you need to publish a bookshelf quality book, I recommend grabbing over 100 formatting templates and in-depth tutorial videos by signing up to the Master Package. Right now I’m also giving away some crazy bonuses to help with your book marketing and promotion.
I’m on a quest to make a full-time living with my writing, and I share everything I learn! I have several free guides to writing, publishing and book marketing – they’ll help you avoid serious mistakes that can ruin your journey. You can find them on my main blog, CreativIndie.
You can also check out my main book cover design site, or my blog Creativindie.com where I help authors and artists produce and sell their best work.
Don’t Have Adobe InDesign?
Get Adobe InDesign CC for just $19.99 per month!